Recipes
Passing data between the plugin/widget’s main and UI contexts#
The @create-figma-plugin/utilities library includes 3 functions to facilitate data passing (in both directions) between the plugin/widget’s main and UI contexts:
on(name, handler)— Registers an eventhandlerfor the given eventname.once(name, handler)— Dittoon, only thathandlerwill run at most once.emit(name, ...args)— Callingemitin the main context invokes the event handler for the matching eventnamein your UI. Correspondingly, callingemitin your UI invokes the event handler for the matching eventnamein the main context. Allargspassed afternamewill be directly applied on the event handler.
Consider a toy Figma plugin:
// src/main.ts

import {
  once,
  // ...
} from '@create-figma-plugin/utilities'

export default function () {
  function handleSubmit (data) {
    console.log(data) //=> { greeting: 'Hello, World!' }
  }
  once('SUBMIT', handleSubmit)
  // ...
}
// src/ui.tsx
import { render, Button } from '@create-figma-plugin/ui'
import {
emit,
// ...
} from '@create-figma-plugin/utilities'
import { h } from 'preact'
function Plugin () {
// ...
function handleClick () {
const data = { greeting: 'Hello, World!' }
emit('SUBMIT', data)
}
return (
// ...
<Button onClick={handleClick}>Submit</Button>
// ...
)
}
export default render(Plugin)See that:
- In the main context, we’re using
onceto register thehandleSubmitevent handler for the event nameSUBMIT. - In the UI context, we’re using
emitto trigger the event handler in the main context for the event nameSUBMIT. - In the main context, the
datareceived by thehandleSubmitevent handler is precisely thedataobject that was passed toemitin the UI context.
Specifying multiple commands in the plugin sub-menu#
This is applicable to plugins only.
Menu commands are specified on the "menu" key under "figma-plugin":
{
"figma-plugin": {
"id": "837846252158418235",
"name": "Flatten Selection to Bitmap",
"menu": [
{
"name": "Flatten Selection to Bitmap",
"main": "src/flatten-selection-to-bitmap/main.ts",
"ui": "src/flatten-selection-to-bitmap/ui.ts"
},
"-",
{
"name": "Settings",
"main": "src/settings/main.ts",
"parameters": [
{
"key": "resolution",
"description": "Enter a bitmap resolution"
}
]
}
]
}
}
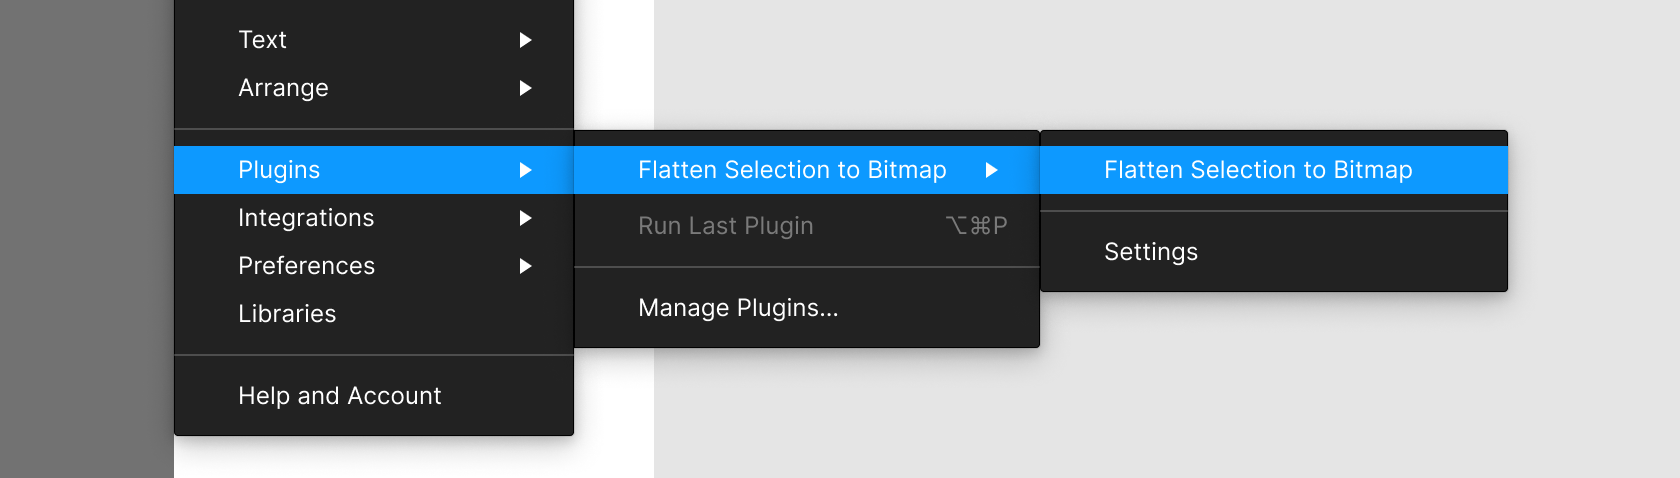
}See that:
"Flatten Selection to Bitmap"and"Settings"are the two commands in the plugin sub-menu.- The
"Flatten Selection to Bitmap"command has a UI implementation. "Settings"is a parameter command that receives a singleresolutionparameter via the Quick Actions search bar.- A
"-"is used to specify a separator between the two commands in the plugin sub-menu.
The above configuration would result in the following:
See the other configuration options.
Configuring relaunch buttons#
Relaunch buttons are applicable to Figma plugins only.
Relaunch buttons are configured on the "relaunchButtons" key under "figma-plugin":
{
"figma-plugin": {
"id": "786286754606650597",
"name": "Organize Layers",
"menu": [
{
"name": "Organize Layers",
"main": "src/organize-layers/main.ts",
"ui": "src/organize-layers/ui.tsx"
},
"-",
{
"name": "Reset Plugin",
"main": "src/reset-plugin/main.ts"
}
],
"relaunchButtons": {
"organizeLayers": {
"name": "Organize Layers",
"main": "src/organize-layers/main.ts",
"ui": "src/organize-layers/ui.tsx"
}
}
}
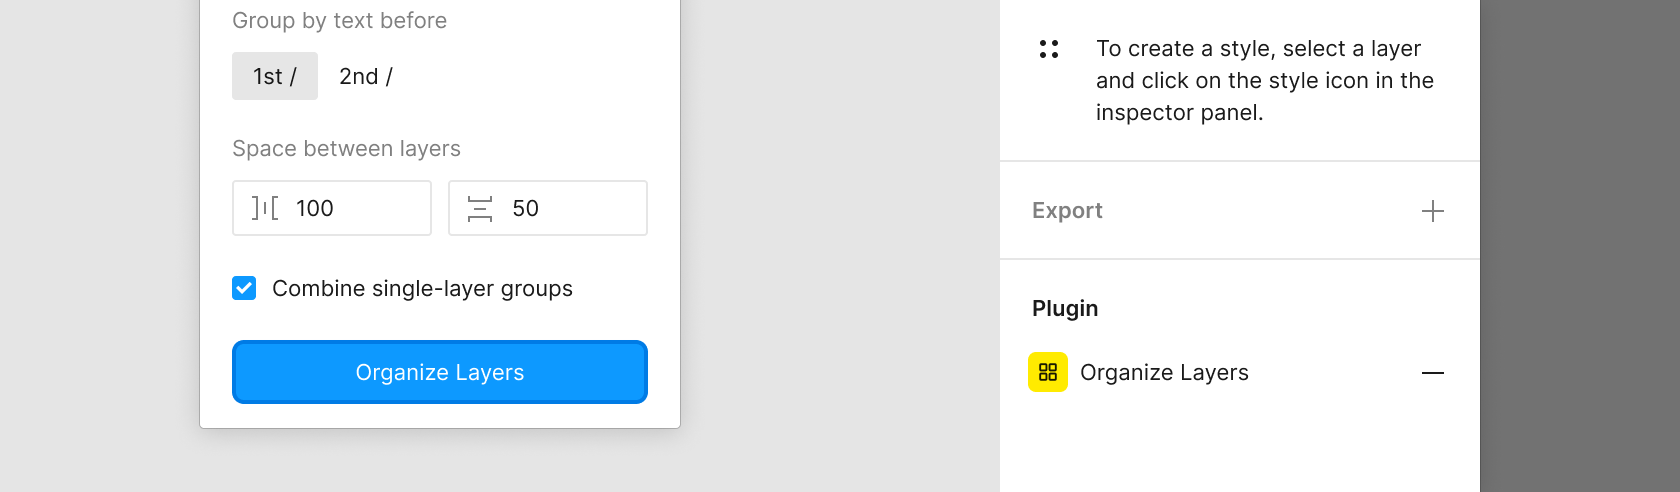
}See that:
"organizeLayers"is therelaunchButtonId.- The object corresponding to
"organizeLayers"specifies the command that runs when the relaunch button is clicked.
Then, call setRelaunchButton in our plugin command’s main entry point:
// src/organize-layers/main.js

import {
  setRelaunchButton,
  // ...
} from '@create-figma-plugin/utilities'

export default async function () {
  setRelaunchButton(figma.currentPage, 'organizeLayers')
  // ...
}
The second argument passed to setRelaunchButton must be a particular relaunchButtonId as configured on the "relaunchButtons" key of our package.json. In the above example, we’re associating figma.currentPage with the organizeLayers relaunch button command.
This would result in the following:
To show additional text below the relaunch button, pass a third argument to setRelaunchButton:
setRelaunchButton(
  figma.currentPage,
  'organizeLayers',
  { description: 'Organizes all layers on the page based on layer name' }
)
Using image assets in your plugin/widget UI#
Image assets used in your plugin/widget UI must be “inlined” into the UI bundle. Consider the following example where a PNG image is used in the UI:
// src/ui.tsx

import { render } from '@create-figma-plugin/ui'
import { h } from 'preact'

import image from './image.png'

function Plugin () {
  // ...
  return (
    // ...
    <img src={image} />
    // ...
  )
}

export default render(Plugin)
Note that image is a Base64-encoded data URL string of the imported image.png file, so it is set as the src attribute of the img HTML element.
If you’re writing your plugin/widget in TypeScript, you’ll also need to add a .d.ts typings file to your project’s src directory containing the following:
// src/image-assets.d.ts

declare module '*.gif' {
  const content: string
  export default content
}
declare module '*.jpg' {
  const content: string
  export default content
}
declare module '*.png' {
  const content: string
  export default content
}
declare module '*.svg' {
  const content: string
  export default content
}
Making the plugin/widget UI window resizable#
The plugin/widget UI window is not resizable by default; this must be implemented by the plugin/widget itself. In practice, this involves:
- Listening to click-and-drag events in the UI window, and calculating an updated window size based on the mouse position.
- Calling
figma.ui.resizewith the updated window size.
@create-figma-plugin/ui includes a useWindowResize hook that makes it easier to implement a resizable UI window:
// src/ui.tsx

import { render, useWindowResize } from '@create-figma-plugin/ui'
import { emit } from '@create-figma-plugin/utilities'
import { h } from 'preact'

function Plugin () {
  // ...
  function onWindowResize(windowSize: { width: number; height: number }) {
    emit('RESIZE_WINDOW', windowSize)
  }
  useWindowResize(onWindowResize, {
    minWidth: 120,
    minHeight: 120,
    maxWidth: 320,
    maxHeight: 320
  })
  // ...
}

export default render(Plugin)
The hook takes two arguments:
- The first argument is an
onWindowResizecallback that will be invoked with the updatedwindowSizein response to click-and-drag events on the bottom and right edges of the UI window. Within this callback, weemittheRESIZE_WINDOWevent, and pass along the updatedwindowSize. - The second argument is an optional configuration object where we can set a minimum and maximum size for the resizable UI window.
In the main context, we register a handler for the RESIZE_WINDOW event, and invoke figma.ui.resize with the new window size:
// src/main.ts

import { on, showUI } from '@create-figma-plugin/utilities'

export default function () {
  // ...
  on('RESIZE_WINDOW', function (windowSize: { width: number; height: number }) {
    const { width, height } = windowSize
    figma.ui.resize(width, height)
  })
  // ...
  showUI({
    width: 240,
    height: 240
  })
}
To restrict the resize direction, set options.resizeDirection to either horizontal or vertical:
useWindowResize(onWindowResize, {
  minWidth: 120,
  maxWidth: 320,
  resizeDirection: 'horizontal'
})
The useWindowResize hook also supports toggling the UI window size on double-clicking the bottom and right edges of the UI window:
useWindowResize(onWindowResize, {
  minWidth: 120,
  minHeight: 120,
  maxWidth: 320,
  maxHeight: 320,
  resizeBehaviorOnDoubleClick: 'minimize'
})
Setting options.resizeBehaviorOnDoubleClick to minimize means that the UI window will be set to the minimum size on double-click. Correspondingly, setting it to maximize means that the UI window will be set to the maximum size on double-click.
For a runnable example, try the preact-resizable plugin template:
$ npx --yes create-figma-plugin --template plugin/preact-resizableCustomizing the build#
Customizing the underlying esbuild configuration#
The build-figma-plugin CLI is powered by the esbuild compiler. To customize the underlying build configuration for the main bundle, create a build-figma-plugin.main.js file:
// build-figma-plugin.main.js

module.exports = function (buildOptions) {
  // ...
  return {
    ...buildOptions,
    // ...
  }
}
buildOptions is the original esbuild configuration object used internally by the build-figma-plugin CLI. The exported function must return the new configuration object to be used.
(Using export default in place of module.exports = is supported only if "type": "module" is specified in your package.json file.)
Correspondingly, use a build-figma-plugin.ui.js file to customize the build configuration for the UI bundle.
Disabling automatic swapping of React imports#
The build-figma-plugin CLI will detect and automatically swap out all react and react-dom imports with preact/compat. To disable this behaviour, create a build-figma-plugin.ui.js file:
// build-figma-plugin.ui.js

module.exports = function (buildOptions) {
  return {
    ...buildOptions,
    plugins: buildOptions.plugins.filter(function (plugin) {
      return plugin.name !== 'preact-compat'
    })
  }
}
Customizing the manifest.json file#
To modify the manifest.json file just before it gets output by the build-figma-plugin CLI, create a build-figma-plugin.manifest.js file:
// build-figma-plugin.manifest.js

module.exports = function (manifest) {
  // ...
  return {
    ...manifest,
    // ...
  }
}
The exported function receives the original manifest.json that’s created by the build-figma-plugin CLI, and must return the new manifest.json plain object to be output.